


Boyd’s Guide to Homebrewed Beer
IT professional Steve Boyd enjoys a good brew — as long as he makes it.
After 37 years with the Atlanta Journal-Constitution and now with the AJT, , Jaffe’s focus is lifestyle, art, dining, fashion, and community events with emphasis on Jewish movers and shakers.

Oracle Corporation techie Steve Boyd and wife, Inna, an attorney, are members of Temple Kol Emeth. They’re also budding brewers, with the secrets to making delicious DIY beer at home.

“Homebrewing was outlawed by Prohibition in 1919,” Boyd explained. “Even after repeal, the ban on it remained until 1978, when President Carter made homebrewing legal again at the federal level. It was then up to the individual states to formally permit it. This happened gradually; the last two, Mississippi and Alabama, legalized in 2013.” Homebrewers are allowed to brew 200 gallons of beer per person per year, but one still has to be 21 years old to drink it. Hard spirits are still illegal to make without a license.
Boyd’s passion for brewing began a decade ago, when he borrowed a coworker’s brewing magazine. Another friend, who was already a homebrewer, invited him over to his house to brew, sample and bottle. He was hooked and began to research brewing equipment.
The actual “brew day” is 4 to 5 hours from the time the water boils to the moment Boyd puts the beer away to ferment. About a month or so later, it will be ready to drink. Boyd recommends waiting to buy a kit. Help a friend with a brew day first, or take a class, he suggests. A good beginner kit will have tools to make beer for years.
“You can use household items to offset cost — my main brew pot is an old 5-gallon stock pot, plus a 7-gallon plastic bucket to ferment — or you can spend literally thousands of dollars on a complete, all-in-one brewing setup where all you do is add ingredients and come back in 3 weeks to beer,” he said.
For cost comparison, “I typically make 5 gallons of beer at a time, or about 40 glasses. I spend about $40 to $50 per batch on ingredients, which means I’m spending just over $1 a glass, not including equipment costs. I’ve been able to make an Irish stout that tastes similar to what we had in Ireland, much better than the U.S. Guinness.”

Boyd owns a kegerator to serve beer on tap, with the foam head that forms naturally from the carbon dioxide produced by the yeast released from the pressurized keg — much like the head that forms when pouring a bottle into a glass.
Boyd is an analytical whiz, but how hard would this process be for the average person? “I’ve been working in computer security for almost 30 years,” he said. “If you can follow a recipe for making soup from a cookbook, you can make wort, and that’s the hard part.”
Boyd’s father-in-law, Lev Mebel, a native of Latvia who knows his way around a good ale, said, “Steve makes light and dark beer. Both have very pleasant tastes. We enjoy comparing his different types at family gatherings. His Guinness beer tastes equal or better than commercial. His light beer tastes equal to commercial German beers.”
Steve’s Condensed Brewing Timeline:
1. Figure out what kind of beer you want to make to determine the ingredients.
2. Get the sugars out of the grains, so that the yeast can convert them. Soak malted barley and other grains yourself, or you can use canned barley extract.
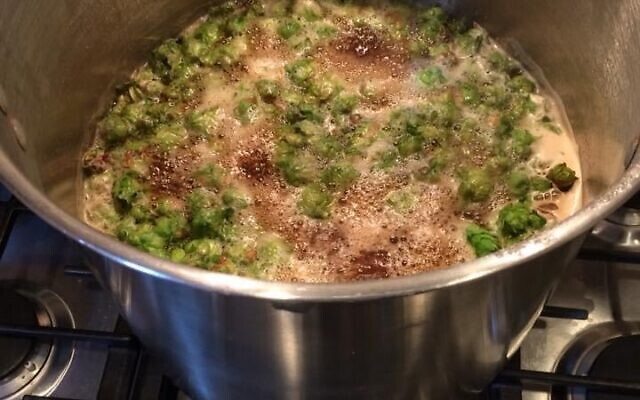
3. Once grains are “mashed,” drain and store the runoff water in a brew pot to boil. During the boil, add hops. The earlier in the boil hops is added, the more bitter the beer; the later, the “hoppier” it will smell and taste.
4. After boiling, cool it down, transfer the wort into the fermenter, use a hydrometer tool to measure how much sugar is in the wort and record. Add yeast, cover the fermenter and store all in a cool, dark place.
5. After a week, take a sample of the beer every couple of days, using a hydrometer to assess remaining sugar. When that reading stops changing, it’s time to keg or bottle. (Tasting is encouraged.)
6. Clean after each step to avoid bacteria build-up. Equipment must be cleaned before putting away. The fermenter needs to be cleaned after use, then sanitized. Bottles and kegs need to be cleaned out after emptying.
7. Boyd recommends local homebrew stores Schoolhouse Brewing in Marietta (also offers classes) and Brew Depot in Alpharetta.
comments